| Tear Drop Swirl Technique | ||
| Author: Wholesale Supplies Plus Friday, November 2, 2018 |
|
|
We wanted to try a new type of swirl in our holiday soap and decided on the tear drop swirl. This tutorial will guide you through this technique.
1. As with most swirls, you want to keep the batter as fluid as possible. We soaped with 72% liquid oils and used a 3:1 water ratio. We also soaped at 90°F to keep the batter fluid while creating our tear drop.
2. To plan out our swirl, we decided to use four holiday colors. Each color would be mixed with 1.50 oz. of batter. The remaining batter would be divided into approximately three equal parts. Based on a 44 oz. batch, we chose to add 12 oz. of batter to two Mix and Pour Funnel Pitchers and the remainder, or 14 oz., would be poured into the bottom of the mold.
3. After we mixed our lye water and weighed our oils and butters for melting, we prepared our colors. We added ½ teaspoon of color to four separate cups. Smaller cups (2 oz.) work best because it gets the colors closer to the batter and makes it easier to pour. Once our oils and butters had melted, we mixed each color with 1 tablespoon of oils.
4. Once our oils and lye water had cooled to around 90°F, we added sodium lactate to the lye water to give us a harder bar. We began to stick blend just until very light trace. We poured 1.5 oz. of batter into each of our color cups and mixed well. To our funnel pitchers, we added 12 oz. of batter each and the remaining batter was poured into our loaf mold.
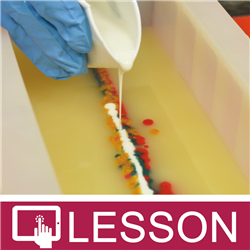
5. Decide on the order the colors should be poured. We started with green and slowly poured the color down the middle of the batter being careful not to break through the batter. We went back and forth once. We then poured the red right over the green going back and forth once. The color does not have to be thick and does not have to completely cover. We then added the gold and followed with white. We continued in this manner 5 to 6 times. Remaining colors will be used to decorate the top. Try to keep the colors in the middle of the mold. If the colors spread out to the sides of the mold, it will affect the look of the tear drop.
2. To plan out our swirl, we decided to use four holiday colors. Each color would be mixed with 1.50 oz. of batter. The remaining batter would be divided into approximately three equal parts. Based on a 44 oz. batch, we chose to add 12 oz. of batter to two Mix and Pour Funnel Pitchers and the remainder, or 14 oz., would be poured into the bottom of the mold.
3. After we mixed our lye water and weighed our oils and butters for melting, we prepared our colors. We added ½ teaspoon of color to four separate cups. Smaller cups (2 oz.) work best because it gets the colors closer to the batter and makes it easier to pour. Once our oils and butters had melted, we mixed each color with 1 tablespoon of oils.
4. Once our oils and lye water had cooled to around 90°F, we added sodium lactate to the lye water to give us a harder bar. We began to stick blend just until very light trace. We poured 1.5 oz. of batter into each of our color cups and mixed well. To our funnel pitchers, we added 12 oz. of batter each and the remaining batter was poured into our loaf mold.
5. Decide on the order the colors should be poured. We started with green and slowly poured the color down the middle of the batter being careful not to break through the batter. We went back and forth once. We then poured the red right over the green going back and forth once. The color does not have to be thick and does not have to completely cover. We then added the gold and followed with white. We continued in this manner 5 to 6 times. Remaining colors will be used to decorate the top. Try to keep the colors in the middle of the mold. If the colors spread out to the sides of the mold, it will affect the look of the tear drop.
6. When the colors had been poured, we took a funnel pitcher in each hand. At the same time, we carefully but quickly poured down the sides of the loaf mold filling the mold with batter. You will see the batter push the colors towards the middle and this will also push them down to make the tear drop.
7. We finished the loaf by drizzling the colored batter over the top of the mold. This can be done in any design and any order. Using a skewer or dowel, we swirled the top of the colors in an “S” pattern until we liked the design.
8. We let the mold set overnight. We placed the mold in the freezer for about 30 minutes to make it easier to unmold. After unmolding, we carefully sliced our bars, anxious to see our tear drop. And, it did work.
Larger tear drops can be made by adding more colors back and forth. The more fluid the batter, the easier it is to pour. Also, when pouring the batter along the sides, it is best to pour as quickly as possible as this works better to push the colors towards the middle and down to create the tear drop.