When you are master batching soap/cosmetics for a large event, it’s best to plan each step ahead of time to ensure an efficient process. We call this streamline production. By streamlining your soapmaking process, you will have everything ready ahead of time so that when it’s time to actually make your product, all you have to do is melt, mix and pour! It can also help protect your trade secrets from employees! When streamlining the production, employees, who may even be temporary as-needed workers, can only see certain steps of your process. Streamlining can prove to be beneficial in many ways, but it can be a difficult adjustment at first. Here are some tips to use as a guideline when streamlining your next large melt and pour batch! (The same concepts can be applied for any of your handmade products, not just soap.)
Organize Your Workspace Once you have everything you need, it is time to prepare your workspace. Clear a large, clean space that is dedicated to this specific project. Next, gather all ingredients and supplies. This includes: soap bases, colors, fragrances, cutting tools, mixing tools, scale, bowls, measuring cups, droppers, rubbing alcohol, molds, mats, paper towels, etc. Organize in a way that makes sense to you and so that everything can be easily found!
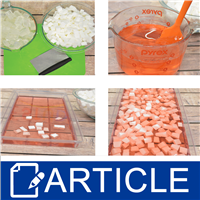
Delegate Work and Prep Now it’s time to get to work! Do you have other employees working for you? (Spouses and children count!) If so, decide who is going to do what. If its just you, be sure you are aware of everything that needs to be done before you begin. When streamlining Melt and Pour soapmaking you should: • Cut up soap into small blocks/cubes and weigh. • Pre-measure fragrance and color. Label if necessary. • If you are making more than one soap recipe, group the cut soap with corresponding fragrance and color for that recipe. • Set out molds so that they are ready to be poured into. Use molds with many cavities or large capacity and use as many as possible.
Melt, Mix & Pour! Once everything is prepped, you are ready to go! At this point, you should have everything you need right in front of you so all you have to do is melt your soap, mix in additives and pour into the molds! You will probably need to do several batches of the same product, depending on the total volume and your equipment capacity. Work on the same product until the full batch is complete, then move onto the next. Continue to repeat the ‘melt, mix & pour’ process until your large batch is complete! Take breaks that allow you to easily pick up where you left off, and try to remain as tidy as possible. Enjoy the simplicity of the process and soon you’ll be streamlining like a professional!
Buy Supplies - Related Items
Questions & Answers (0)
Question + Answer. Here you can ask or answer questions All questions are queued and answered quickly during business hrs. You can also answer questions posted by other customers if you have valuable information.
0 Question(s) Shown Below
No items listed at this time, please check back often as we are adding kits/items everyday.