TemperatureThe pour temperature of the second layer is extremely important to monitor when layering soap. Keep the temperature at about 125°-130°F or it can melt the layer that you are pouring onto.
Spray with Rubbing AlcoholIn order for the layers to adhere, you must spray the first layer with rubbing alcohol. This melts the surface a bit (alcohol is a solvent) and allows for the second layer and first layer to combine.
Note: You will be spraying the first layer twice with alcohol. The first spray is right after you pour the first layer to pop surface bubbles and the second spray is right before you pour the second layer so the layers will adhere together.
Hardness of First LayerMake sure that your first layer is setup and hard enough to support the next layer. To check the hardness you can gently blow onto the soap surface, or tap the mold (if silicone) to see if the surface has formed a thick skin. If so, you are ready to pour the next layer.
Another trick is to pour onto a silicone spatula to help the soap fall softly onto the first layer instead of in a hard stream from high up that can break the first layer’s skin.
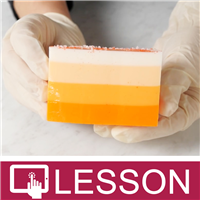
Dividing Up Your ColorsTo evenly divide your layers up into colors you can weigh your base into equal amounts and color. For example, if you are filing a
Regular Loaf Silicone Mold (44 oz.) and want to color using 4 layers, then you will divide the base into four equal amounts - 11 oz. each. If you don’t care that the layers are even and are looking for more of an organic look, then don’t worry about weighing and just eyeball the amounts.
To walk you through the basic process, I am going to use 44 oz. of MP Soap Base and make an even four-layered loaf in a
Regular Loaf Silicone Mold.
I know that this mold will hold 44 oz. of MP Soap Base and that I want four even layers. Each layer will be 11 oz. of base.
Step 1: Weigh out 11 oz. of MP Soap Base, chop into small cubes and put into a double boiler to melt.
Step 2: Once melted remove from the double boiler and let cool to 140°F. Add scent and color.
Step 3: Pour into the mold. This is the initial layer so the temperature just needs to be at 140°F or below. Each layer after this will need to be 125°-130° F.
Step 4: Spray with alcohol to pop any surface bubbles. While this layer is cooling, prepare the next layer by repeating steps 1-2.
Step 5: Check your first layer to make sure it is hard and set up enough to pour onto.
Step 6: Check the temperature of your second layer soap base to make sure it is 125°-130°F.
Step 7: If your first layer is setup enough and the temperature of your second layer soap base is in the correct range, spray the first layer generously with rubbing alcochol and pour the melted soap onto the first layer gently. Remember that you can pour over a spatula to help it gently fall onto the first layer without the risk of breaking the skin.
Step 8: Repeat steps 1-7 for each additional layer of soap.
Step 9: Once fully hardened, you can remove the soap from the mold. To harden the soap faster, you can place in the refrigerator but never put in the freezer. Wear gloves when you unmold your soap to reduce fingerprints.
Step 10: If you made a loaf of soap, you can slice upon unmolding. Make sure the soap loaf has completely hardened throughout or the center will ooze out when cutting.
Step 11: Wrap your soap in plastic wrap to prevent condensation and sweating.
Note: You can melt the MP Soap Base layer by layer individually or you can melt a master-batch of 44 oz. soap base and pour 11 oz. into another container to color, scent and pour for each layer. Just be sure to monitor the temperatures carefully. Do not let the base in the double broiler get above 145°-155°F (maximum temperature depends on the soap base).