Craft Your Own Christmas Bath Bomb Ornaments
Delight in the holiday season with our step-by-step guide on how to create your very own Christmas Ornament Bath Bomb. Utilizing our Bath Bomb and Fizzy Base, you can effortlessly whip up exquisite last-minute gifts that your loved ones will adore! Not only do our plastic bath bomb molds serve as exceptional molds, but they double as secure packaging and can be transformed into charming holiday ornaments. Simply adorn them with a ribbon and grace your Christmas tree with them.
This formula is enhanced with the addition of shea butter. Shea butter brings a luxurious touch to these bath bombs, ensuring they effortlessly release from the molds. Should you prefer, feel free to swap in mango butter or cocoa butter to tailor this delightful DIY Christmas bath bomb recipe to your liking.
Key Information for Crafting Bath Bomb Ornaments- Difficulty: Beginner
- Yield: 7 Bath Bombs
Timing is Everything- Prep Time: 5 Minutes
- Perform Time: 20 Minutes
- Drying Time: 4 Hours
- Total Time: 4 Hours 25 Minutes (25 minutes active time)
Essential Supplies for Christmas Bath Bomb MoldsIngredients for a Festive Fizz
Directions to Delight
Step 1 – Mix the Bath Bomb Base
Begin by melting the shea butter in a small microwaveable bowl for about 2 minutes on high power, or until fully melted, pausing to stir halfway through. Allow it to cool slightly afterward. Blend the liquid colorant with the isopropyl alcohol. Combine the shea butter and isopropyl alcohol mixture with the bath bomb base in a large mixing bowl. Thoroughly mix using your hands, checking the consistency; it should clump distinctly when squeezed. If it appears too crumbly, a few drops of isopropyl alcohol can be added to perfect the texture.
Step 2 – Mold the Bath Bombs
Press some mixture into one half of your plastic bath bomb mold, adding a bit extra at the center for a rounded effect. Clean any excess off the mold edges. Ensure you match each mold half correctly! Firmly press the two halves together, aligning the eyelets. Continue with the remaining molds.
Step 3 – Finish with Flair
Let the bath bombs rest on a countertop for two hours. You can unsnap the covers and tidy the edges with a paper towel for a neater presentation, though this step is optional. Once dry, either remove from the molds or close them and thread a ribbon through the holes in each mold. Display on your tree and enjoy! Remind your recipients that these bath bomb ornaments are best used within a couple of months to ensure freshness—they won’t last until next Christmas!
Our Color Recommendations
To infuse your Christmas tree with a festive flair, consider exploring a palette beyond the traditional. While grass green serves as a vibrant base reminiscent of evergreen boughs, the addition of various hues can transform your bath bomb ornaments into a spectacular holiday display. Here are several color pairing ideas to inspire your creations:
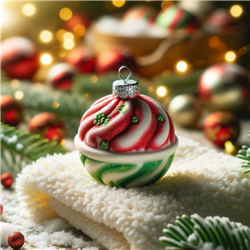
- Vibrant Reds and Grass Green: A classic combination that echoes the timeless Christmas tradition. This pairing brings to life the joyful essence of the holiday season, reminiscent of holly berries nestled among green leaves.
- Snowy Whites and Glittery Golds: For a touch of winter wonderland, blend snowy whites with shimmering golds. This elegant duo evokes a serene and luxurious holiday atmosphere, reflecting the peacefulness of a snowy Christmas morning.
- Midnight Blues and Silvery Sparkles: Capture the enchantment of a clear, starry night by combining deep blues with silver accents. This sophisticated pairing is perfect for adding a mysterious and elegant touch to your tree.
- Warm Coppers and Rich Greens: Embrace the warmth of holiday cheer with the earthy tones of copper paired with lush greens. This combination offers a more subdued yet equally festive alternative, perfect for a rustic or bohemian holiday theme.
- Frosted Lavenders and Soft Pinks: For a whimsical and unique approach, blend frosted lavenders with soft pinks. This pastel pairing brings a playful and gentle aesthetic to your holiday decor, ideal for a more modern or minimalist tree.
- Radiant Oranges and Cinnamon Browns: Inspired by the glow of firelight and the spice of holiday treats, this pairing combines the warmth of orange with the depth of cinnamon brown. It’s a cozy and inviting color scheme that adds a comforting ambiance to your festive decorations.
- Rich Purples and Gold Accents: Combine the regal elegance of deep purples with the luxury of gold accents. This lavish color scheme adds a touch of sophistication and splendor to your Christmas tree, perfect for creating a focal point of beauty and opulence.
These color combinations not only celebrate the diversity of holiday decorations but also allow for personal expression through your DIY Christmas bath bomb creations. By experimenting with these hues, you can create bath bomb ornaments that complement your holiday décor, making your Christmas tree a testament to your creativity and festive spirit.
Tips and Tricks
- Color Mixing: Experiment with blending different liquid colorants to achieve unique shades for your Christmas bath bombs DIY projects.
- Scent Selection: Choose holiday fragrance oils that complement your home’s Christmas theme. From the refreshing scent of pine to the sweet aroma of cinnamon, the right fragrance can enhance the festive atmosphere.
- Ribbon Choices: Opt for ribbons that match your holiday décor. Satin ribbons offer a glossy finish, while textured ribbons can add a rustic touch to your bath bomb ornaments.
- Gift Packaging: Personalize your bath bomb gifts with handmade tags or stickers. A personal touch shows extra care and makes your gifts even more special.
By following this guide and incorporating your own creative touches, you can create beautiful and festive bath bomb ornaments that will dazzle and delight you. Perfect for gifts or decorating, these DIY Christmas bath bombs are sure to add a touch of magic to your holiday season.