| |
|
|
|
|
|
| How to Make Candles at Home |
Author: Wholesale Supplies Plus
Thursday, January 11, 2024 |
|
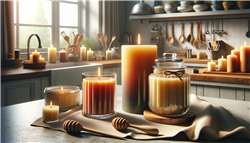
Embarking on the journey of candle making is not only a creative outlet but can also be a stepping stone into a thriving business. Whether you're crafting for personal pleasure or with entrepreneurial aspirations, understanding the nuances of candle making is crucial. This comprehensive guide will illuminate the art of creating candles at home, providing detailed insights into the necessary ingredients, beginner-friendly techniques, safety precautions, and more. Let's dive into this mesmerizing world and light up your candle making skills!
What Ingredients Do You Need for Homemade Candles?
To start your candle making adventure, you’ll need a range of ingredients and tools: - Wax: The type of wax you choose determines the burn quality and fragrance throw. Paraffin wax is popular for its strong scent and vibrant colors, soy wax is renowned for its eco-friendly and clean-burning qualities, beeswax offers a natural honey scent and is smokeless, and gel wax allows for creative styles and see-through candles.
- Wicks: The wick is the engine of the candle. Cotton wicks are commonly used, but there are also wooden and hemp wicks. The size and type of the wick should correspond to the wax type and candle diameter for an even burn.
- Fragrance Oils: These add aroma to your candles. It's vital to use oils that are safe for burning. The fragrance load (the percentage of oil the wax can hold) varies with different wax types.
- Dye Flakes: These colorants are specifically made for candles. Liquid dyes and mica powders are also options, but avoid water-based dyes as they don’t mix with wax.
- Double Boiler: A safer alternative to direct heat, a double boiler allows for controlled melting of the wax and reduces the risk of overheating.
- Heat Proof Container: Essential for transferring and pouring melted wax.
- Thermometer: Wax needs to be heated and cooled to specific temperatures for optimal scent throw and setting.
- Spatula: For stirring the wax mixture and ensuring even distribution of color and fragrance.
- Wick Bars: Used to keep the wick centered and straight while the wax sets.
- Scissors or Wick Trimmer: For cutting the wick to the right length, which is crucial for proper burning. (Nail clippers also make a great option for this as they make trimming wicks in jars easier than using scissors)
- Safety Gear: Gloves protect from hot wax and splatters, and goggles are essential for eye protection, especially when dealing with hot materials and potential splashes.
Choosing quality materials and tools is key to making candles that are not only beautiful but also safe and functional. How to Make Candles for Beginners
For beginners, candle making can be simplified into these key steps: - Melt the Wax: Use a double boiler for even and controlled heating. Wax should be melted slowly to avoid burning. Different waxes have different melting points; for example, soy wax generally melts at around 120-160°F. Note: Even though the melt point is lower, you will want to heat straight soy waxes to 185°F to ensure the color blends.
- Stir in Scent and Dye: Add fragrance oil and dye at the right temperature. If added too hot, the fragrance may evaporate; if too cool, it may not mix properly. The general rule is to add fragrance oil at about 180°F for paraffin and slightly lower for soy wax depending on the fragrance, as some thicker fragrance oils need to be added at a hotter temperature to effectively blend with the soy wax.
- Wick Your Containers: Securing the wick is crucial for an even burn. Use a wick sticker or a dab of melted wax to fix the wick at the bottom of the container.
- Pour the Wax: Pour slowly to avoid air bubbles, which can cause uneven burning. The pouring temperature varies by wax type; for instance, soy wax is poured at a lower temperature than paraffin.
- Let the Candles Cool and Set: Candles should cool undisturbed in a warm area to prevent cracking. Cooling too quickly can cause sinkholes.
- Cure the Candles: Curing time varies; soy candles typically need about 2 weeks, whereas paraffin may only need a few days. This step is vital for the best fragrance throw.
- Trim the Wick: A wick trimmed to about ¼ inch ensures a cleaner, safer burn and prevents soot and mushrooming.
Each step in the process is a blend of art and science, requiring patience and attention to detail. What is Safe to Put in Homemade Candles?
When customizing candles, safety is the top priority. Safe additives include: - Wax Embeds: These are decorative wax pieces that melt along with the candle. Ensure they are made of the same type of wax as your candle for consistent burning.
- Fragrance Oils: Use only those intended for candles, as others might not be heat stable and can be a fire hazard.
- Candle Dyes and Dye Flakes: These are designed to blend seamlessly with wax without affecting the burn quality.
Avoid adding foreign materials like dried flowers or glitter, which can be flammable or create unsafe burning conditions. What Not to Do When Making Candles?
Avoid these common mistakes for safe and effective candle making: - Don’t Use Crayons for Dye: Crayons are made of materials that can clog the wick, leading to poor burning and potential fire hazards.
- Avoid Melting Wax in the Microwave: This method can lead to uneven heating and potential overheating, which is dangerous.
- Don’t Substitute Perfume for Fragrance Oils: Perfumes are not designed for high heat and can contain alcohol, leading to fire risks.
- Don’t Burn Candles Too Long: Extended burning can overheat the container, leading to the risk of cracking or shattering, especially with glass containers.
- Avoid Refrigerating Candles: Rapid cooling can cause cracks and affect the wax's consistency.
- Limit Fragrance Amount: Overloading wax with fragrance can lead to sooting, poor burning, and even fire hazards due to the pooling of oil.
Understanding these "don'ts" is crucial for crafting candles that are not only visually appealing but also safe to use. Conclusion
Making candles at home is a rewarding and creative process that can produce stunning results. By understanding the right ingredients, following step-by-step instructions, and being mindful of safety, you can create beautiful, fragrant candles that enhance any space. Remember, candle making is an art that requires patience, practice, and a willingness to learn. Embrace the process and enjoy the journey of becoming a candle-making artisan!
 |
| Buy Supplies - Related Items |
|
Questions & Answers (0) |
|
| Question + Answer. Here you can ask or answer questions All questions are queued and answered quickly during business hrs. You can also answer questions posted by other customers if you have valuable information. |
 |
0 Question(s) Shown Below |
No items listed at this time, please check back often as we are adding kits/items everyday.
|
|
|
|
|
|
|