Lip balm bases are super simple to work with and make streamlining your lip balm production a snap. Lip balm bases are specially formulated using 100% naturally derived ingredients including waxes, butters and oils.
Choose Your Lip Balm Base
There are two types of lip balm bases available, one for tubes and one for pots.
Lip Balm Base for Sticks - This base is hard enough for lip balm tubes. It is a super smooth base with a conditioning feel.
Lip Balm Base for Pots - This silky base is softer than the lip balm base for sticks to make it easier to scoop out of pots with your finger.
Additives for Lip Balm
Anything that is oil-soluble can be added to lip balm base. Never add anything water-based, as it will separate out from the lip balm. Some additives include:
Flavor Oils - Flavor oils are used in flavoring lip balms, lip-gloss, and lipstick. Some are sweetened and some are not. The typical usage rate is about 1-2% of the total lip balm recipe, but double check IFRA guidelines to make sure you comply. Sweetened flavor oils should be tested at 1% and then adjusted up from there, as they can taste bitter if too much is used.
Fragrance Oils - Fragrance oil can be used in lip balm as long as it is lip safe. IFRA Maximum Skin Exposure Levels for your fragrance oil for use on lips should be 1% or more. The typical usage rate is about 1% of total lip balm recipe.
Essential Oils - Essential oil can be used in lip balm as well. The usage rate is 1%. Make sure that the essential oil that you use is lip safe, non-phototoxic and IFRA approved up to 1% or more in lip products.
Sweetener for Lip Balm - If you are using a fragrance oil and want to add a sweetener, you can use a Saccharin, a liquid sweetener. This liquid sweetener is cosmetic grade and safe for lip-based products. If you use too much of this product, it will make your lip base bitter. It can go into lip-gloss and chapstick like bases. It cannot be used in products that are going to be eaten or ingested such as edible massage oils, coffees and teas. The typical usage rate is about 1% of total lip balm recipe.
Vitamin E - Vitamin E T-50 is an excellent antioxidant for products containing oils. The usage rate for Vitamin E is 1%.
Colorants - You can add color to your lip balm by using an oil-based colorant such as Oil Locking Mica.
*Make sure that any additives you use in your lip balm are lip safe. *Do not add any perishable liquids such as water, fresh milk, beer, wine, fruit juice, vegetable juice, etc. as they will spoil the lip balm.
Molding and Packaging Lip Balm
Lip balm can be poured into tubes or pots for use and packaging.
Lip Balm Tubes - Lip balm tubes come in many shapes, colors and sizes. You can find slim tubes, oval tubes and the common round tubes. Most styles come in black, white or natural.
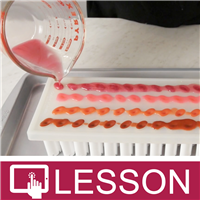
To make filling tubes easier, you can use a
Lip Balm Filling Tray.
Metal Tins - Lip balm can also be poured into metal tins. Two common styles include round tins that come in various sizes and slide tins, which are rectangle shaped with a slide top.
Mini Pots and Jars - There are also a variety of mini pots and jars that you can choose from.
Shrink Wrap - When making products that go onto lips, it is best to provide a tamper evident seal such as shrink-wrap. All of the lip product container pages have a suggested shrink band size so you can easily find the corresponding shrink bands.
Some considerations:
- Softer Lip Balms - Pour into pots, as lip balm tubes will not support a softer lip balm formulation.
- Harder Lip Balms - Pour into tubes for easier application.
The Basic Process
Equipment Required- A heat-safe container
- Scale to weigh ingredients
- Spatula or spoon
- Hair net and gloves
- Plastic dropper
Step 1 - Melt the base on low heat until melted.
Step 2 - Cool to 135°F and add flavor or essential oils and color.
Step 3 - Cool to 130°F and pour into containers.
Step 4 - If tubes were used with pouring tray, allow to harden and scrape off excess. Remove tubes from tray. Cap, label, shrink band and enjoy! If tins or pots were used, allow to cool completely and cap, label, shrink band and enjoy! Never put caps onto warm products as condensation can occur.
Related Videos:
Related Recipes: