Milky Way Molds™ are known all over the world for having unsurpassed detail. Giving color to these details is not only attractive but often just enough to get customers to pay top dollars for a bar of soap. This article looks at three popular techniques used to detail soap molds.
Technique 1: Directing Soap with Rubbing Alcohol
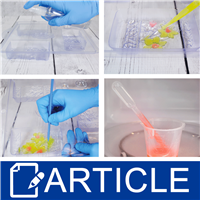
Create slip and glide to the details of the mold by spraying a fine mist of rubbing alcohol inside the mold. This technique allows the soap to slip down the tiny sides of the detail and stay right where you want it. We love using this technique when we use a plastic dropper to direct the soap to very small spaces.
Technique 2: Adjust the Soap Temperature
When using a plastic dropper, keep your soap as thin as possible with a soap temperature over 140ºF. This will allow the soap to flow smoothly out of the dropper and into the small spaces of the mold. As the soap quickly cools to room temperature it will solidify quickly.
Technique 3: Removing Extra Soap
Sometimes soap overflows small detail areas or a drop releases from a plastic dropper in an unintended area. No problem. Simply use a paper click, wooden Popsicle stick, toothpick or small plastic knife to scrape the soap from the area.
Tip: Dealing with Clogged Plastic Droppers
When using a plastic droppers to detail a soap mold they can clog quickly. We microwave them to keep them warm and the soap liquid.
| Question + Answer. Here you can ask or answer questions All questions are queued and answered quickly during business hrs. You can also answer questions posted by other customers if you have valuable information. |
 |
0 Question(s) Shown Below |
No items listed at this time, please check back often as we are adding kits/items everyday.
|