Why Create Custom Molds? Special occasions often call for special molds. While there are many different love and wedding mold options available for weddings, sometimes you're looking for something more personalized. Ordering a custom mold is an option (usually a pricey one), but you can also make one yourself! In this short article, we will show you how we made our own molds to create these guest-sized soaps.
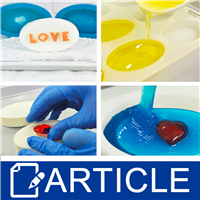
Creating The Model The first step to making your own mold is to create a model. The model begins as a plastic cast of the overall shape of your finished bar. We started with Crafter's Choice® Oval Guest Silicone Mold 1608 and liquid plastic to make our guest oval models. While wearing gloves, a mask and working in a well-ventilated area, we mixed equal parts Liquid Plastic Part A and Liquid Plastic Part B in a disposable container. When the container became warm to the touch, we poured the liquid plastic into the mold cavities. Once the liquid solidified and cooled, we removed the white ovals from the mold.
Customizing The Model Once we have the our basic models, we can customize them. First, find solid items that can be glued to the model. We found jewelry pieces (the holes on the sides need to be filled in), red acrylic hearts and self-stick pearl embellishments to create our models. Next, we glued our items to the model with a hot glue gun. The finished plastic ovals with accents are the prototypes for our soap. These models can now be used to make a mold!
Creating The Mold The final step is to produce molds that can be reused to make all your wedding soap bars. We used Silicone Rubber Part A & B to make the mold. First, find a container or other mold this is big enough to hold your model with at least 1/4" of surrounding space. We used Crafter's Choice® Oval Basic Silicone Mold 1606. Next, adhere your model to the bottom of your container or mold. We used hot glue since this peels off easily from the mold when finished. With gloved hands, a mask and working in a well-ventilated area or outside, mix equal parts of Silicone Rubber Part A and Silicone Rubber Part B in another disposable container. Gently mix well, and try to avoid producing air bubbles. Pour the liquid silicone slowly and evenly around your model and continue to pour until a 1/4" layer of silicone blankets your model. Allow to harden. Next, remove the blue silicone from your mold or container and then remove the model from the silicone. The silicone mold is ready for soap! We filled our details with rose gold colored Detergent Free Clear soap and topped it off with Detergent Free Shea Butter soap scented with Citrus Lavender Natural Fragrance Oil to create our personalized soaps.
Buy Supplies - Related Items
Questions & Answers (1)
Question + Answer. Here you can ask or answer questions All questions are queued and answered quickly during business hrs. You can also answer questions posted by other customers if you have valuable information.
1 Question(s) Shown Below
No items listed at this time, please check back often as we are adding kits/items everyday.