The Goal: Swirled soap is not just for cold process soap makers. In this article, we discuss one method for swirling melt and pour soap. Complement the swirled soap with you favorites colors and fragrances for your own unique design!
Ingredients Used:
Crafter’s Choice® Premium Extra Clear MP Soap Base,
Premium Ultra White MP Soap Base,
Crafter's Choice® Azurite Sky Fragrance Oil,
La Bomba Blue Mica Powder and
Celestial Blue Mica Powder.
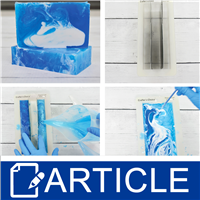
Make Dividers: A key to swirling melt and pour soap is to keep your colors separate until they are just the right temperature to swirl. Dividers in your mold drastically help with this! Use a stiff wax covered paper to create the dividers, here we used a file folder. They should fit snuggly lengthwise in your loaf mold and at least two inches taller than the mold. The height allows for easy removal later.
Choose Your Colors Wisely: At least one contrasting color is important to achieve a vivid melt and pour swirl. We find that using two vibrant colors in clear soap base and the third color as white soap base consistently produces stunning swirled designs. Separate and color your soap into three different containers with your fragrance of choice.
Juggling Soap Temperatures: The best swirled designs happen when all three soap bases are roughly the same temperature when pouring. This becomes increasingly difficult if you only have one microwave! Melt each soap being extra careful not to overheat any of the colors. We recommend getting the soaps to 140ºF each.
Putting It All Together: While holding the dividers in place, pour the most contrasting soap color into the middle section at a temperature of 125ºF to 130ºF. Only pour 1/4” to 1/2” high. Move to the sides by filling each side section with a different soap color matching the level you poured in the middle. Continue filling in this manner until you have reached the top. Carefully remove the dividers. Use a skewer to zig-zag your way through the loaf from end to end. When you reach the end move the skewer along the edges of the mold and remove the skewer and any clumps that may have accumulated on the skewer. Allow to harden and unmold and slice as usual.
| Question + Answer. Here you can ask or answer questions All questions are queued and answered quickly during business hrs. You can also answer questions posted by other customers if you have valuable information. |
 |
0 Question(s) Shown Below |
No items listed at this time, please check back often as we are adding kits/items everyday.
|