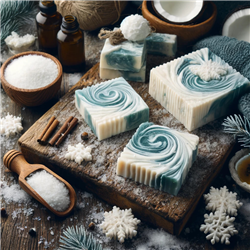
Creating your own Snowdrift Swirl soap is not only a rewarding DIY project but also a delightful way to bring the mesmerizing beauty of swirling snow into your bathroom. This black and white soap boasts an artistic contrast that captures the essence of a snowy winter day with elegance and style. Below the recipe you’ll find some tips and additional insights to help you perfect your soap-making technique and make the most out of this snowy adventure.
DIRECTIONSBefore starting this tutorial please make sure to read all instructions.
You should have a basic understanding of making cold-process soap before you begin this tutorial.
It is always a good practice to put any new recipe through a soap calculator like the one found at
http://soapcalc.net/calc/SoapCalcWP.asp.
Step 1 – Measure All IngredientsNow put on your long sleeves, long pants, shoes, safety goggles, and gloves. Work in a well ventilated area that is free from distractions.
To make the process go faster, measure all ingredients first. To cut down on dishes, measure cold water into the funnel pitcher, measure coconut oil into the large mixing bowl, and measure the essential oils into the same container. Measure sodium hydroxide last.
Step 2 – Make Lye SolutionSprinkle approximately half of the sodium hydroxide into the water, stir gently to avoid splashing. Make sure to avoid breathing any fumes. Repeat, and stir until mixture is dissolved. (Always add lye to water and not the other way around because of the potential lye volcano. Just remember, “Snow falls on the lake.”) Cover with plastic wrap and set aside in a safe place to cool.
Step 3 – Make Oil SolutionMelt coconut oil in 30 second bursts until completely melted. Next, add shea butter and break up big pieces with a spoon and stir until melted. If needed microwave in short bursts. Avoid getting the mixture above 117°F.
Now add the olive oil, melted palm oil, castor oil and avocado oil to the coconut oil and shea butter.
Step 4 – Add Clay to Essential OilsAdd kaolin clay to your peppermint and tea tree essential oils. Mix, then, add to your batch oils and set aside to cool.
Step 5 – Prepare ColorantsFor a Black Swirl:
Add 0.5 tsp smooth coconut carbon powder to a zipper bag and add .5 Tbsp olive oil.
For a Red Swirl:
0.15 cc scoops Red Oxide and a heaping 1/8 tsp Molten Lava Pigment to a zipper bag and add 2 tsp olive oil.
For Both Colors:
Next, add 1.5 tsp titanium dioxide to the other zipper bag. Then, add 1.5 Tbsp olive oil. Then, mix both of these bags until no clumps remain.
(This can be done ahead of time. Be patient as the titanium dioxide takes a bit of time to incorporate. If you don’t completely incorporate it, you will see smears of white in your cut soap.) (I don’t use water to introduce titanium dioxide to my soap because it needs to be stick blended into the oils to mix well. I don’t like stick blending at this point because it can cause the batter to become too thick to swirl. Using titanium dioxide mixed with oil can be stirred in by hand and incorporates nicely.)
Use your hands and a paper towel to smear colorants until smooth.
Step 6 – Make SoapIf you are forcing your soap through gel, now would be a good time to preheat the heating pad.*
When the temperatures of the lye solution and the oil solution are within 85° —95° F, carefully (with safety gear still on) strain the lye solution into the other funnel pitcher and add the sodium lactate. Use paper towels to wipe the strainer and empty the pitcher, then dispose of the paper towels.
Add the lye solution to the oil solution. Pour ingredients down the side of the bowl or down a spatula to avoid adding air bubbles to the mixture.
Stick blend until an emulsion is reached when oils are no longer separated from the lye solution.
Pour 1/8th or 6 oz. of the batter into a funnel pitcher. Add and mix in all of the premixed coconut carbon. If using titanium dioxide, add that to the remaining batter. Stir to incorporate.
Step 7 – Pour SoapWhen your batter is at light trace, it is ready to pour. You can tell your batter is at light trace when it starts to stick to the side of the bowl and stick blender instead of just running off. For this swirl, the thinner your batter is, the thinner and wispier the design will be.
The diagram below shows how to pour and swirl the soap. The top drawing shows the pour. The other two drawings show how to swirl the batter.
First pour around one third of the white batter.
Then, carefully pour all of the black batter on top. Pour close to the surface to avoid breaking through the white batter. (Don’t scrap out all the batter if you want to save a bit for the top design.)
Next, pour remaining white batter, first on the sides and then on top of the black batter.
Step 8 – Swirl SoapWhen you insert the swirl tool for the first time, insert it all the way to the bottom. (The batter on the tool will be a reference to how far it is to the bottom.) Now, drag your swirl tool through the batter, up and down, as shown in the middle drawing above. Using the batter on the tool for reference, try not to touch the bottom.
For the last swirl, follow the path shown in the bottom drawing.
Step 9 – Design Soap TopSplatter remaining batter on top of poured soap in a random pattern.
Then, slightly insert a skewer and drag it back and forth to make the pattern below.
Next, slightly insert the skewer in the left end and drag to the right and repeat many times to make the pattern below.
Step 10 – Put Through Gel*Next, set your mold on top of the heating pad. Then, cover with a box. Next, insulate with blankets/towels. Set your timer for 20 minutes. When the timer rings, slide your hand up under the box and feel the air. If the air is warm, turn off the heating pad. If it’s not warm, keep repeating in 20 minute increments until the air in the box feels warm, then turn off the heating pad. At this point, make sure the mold is snug and keep it covered for at least 48 hours. (The sooner the soap is exposed to air, the more likely it is to develop soda ash.) Ambient temperature matters as well. If your home is warm you probably won’t need the heating pad.
*You don’t have to put your soap through gel; you will get soap no matter if it goes through gel or not. This soap is made with a water discount to prevent glycerin rivers. With less water, soap goes through gel phase faster, often causing partial gel. That’s why it often needs to be forced through gel. Other benefits of forcing soap through gel is that it releases from the mold easier, it is harder, cures faster & lasts longer, the colors are often more brilliant,
and it avoids partial gel.
Step 11 – Unmold and Cut SoapIf the soap releases from the mold easily without sticking to the sides, it’s ready to unmold. If not, cover and let it sit until it’s ready. (It doesn’t pay to rush unmolding.)
Mark your soap top and cut it into 10 bars.
You can wait a day and bevel the edges with a vegetable peeler if desired. Finally, allow them to cure for 4-6 weeks and Enjoy!
Achieving the perfect snow swirl requires a steady hand and a bit of practice. When creating your black and white soap, timing is key. Ensure that your soap batter remains at a light trace so it pours smoothly and allows for optimal swirling. Use a hanger tool to gently swirl the black and white layers without overmixing, creating delicate snow swirls that mimic the graceful dance of falling snowflakes. A skewer is then used to swirl the soap batter on top of the loaf for a finishing touch.
Temperature plays a crucial role in how well your soap colors swirl and set. Too hot, and your soap may set too quickly, hindering your ability to create beautiful swirls. Too cold, and the soap may not fully combine, leading to a less cohesive bar. Aim to keep your soap mixture around 120°F to 130°F for the best results. This range helps maintain a good consistency for swirling while ensuring the soap sets properly.
After you've poured and swirled your soap, curing is the next critical step. Allow your Snowdrift Swirl soap to cure for at least 4-6 weeks. This not only helps the soap harden but also enhances its durability and performance. During this period, keep the soap in a cool, dry place away from direct sunlight and humidity to prevent any sweating or warping of your beautifully crafted swirls.