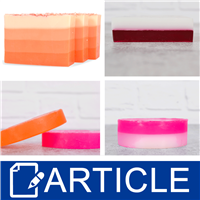
Challenge: Uneven Layered LinesUneven lines can happen for two reasons. First the second layer may be too hot when poured over the first layer causing your pristine line to break. Secondly, if the first layer has not set, the clean lines of your soap bar may be punctured by the second layer when poured. To prevent this make sure that your second layer is poured at a temperature less than 130°F and be PATIENT with your first layer and allow it to cool.
Challenge: Migrating Color LayersDyes are very popular in melt and pour soap making them look like stained glass in clear soap. They are also the most challenging because they are water based causing layers to migrate. Another trouble colorant are lake dyes when a layer is over colored it will cause bleeding. We typically recommend using mica or pigment colors.
Challenge: Layers that Slide ApartYour layers may be perfect but as soon as you unmold your single bar it becomes two. When creating layered soaps, rubbing alcohol allows the layers to adhere to each other. If you forget, don’t fret, your soap can be melted back down and remolded but the next time you layer, don’t forget the 90% rubbing alcohol in between the layers!
Challenge: Surrounding LayersWhen your first layer of soap sits in the mold too long it will shrink. This gap is then filled when the second layer of soap is poured, causing color to surround the bottom layers of soap. Another cause of surrounding layers could be unmolding your first layer before pouring the second layer. The best practice is to set aside enough time to complete your finished product within a day or two. To speed up setting time you can also set your mold in the freezer for 15 minute bursts.
Making the Perfect Layers We recommend following these steps to make the perfect layered soap.
- Select a non-migrating color. Examples are neon colors, mica or pigments.
- The first layer can be poured at any temperature. Allow the layer to form a thick skin before pouring the second layer. Spritz the top with 90% Rubbing Alcohol to pop any bubbles.
- Melt the soap that will become second layer and allow the soap to reach between 125-130°F. Before pouring the second layer spritz the top of the first layer with alcohol to allow for adherence.
- Pour the second layer SLOWLY and then spritz with alcohol again to pop any bubbles that may arise. Another tip is to pour it over the back of a spoon, it helps distribute the soap evenly.
- Allow your second layer to harden completely and then package your finished product.
Additional TipsIf you are creating multiple bars of layered soap at a time or if you need your workspace for something else it is always a good practice to place your mold on a cookie sheet for easy transportation. Moving a mold on its own, especially a silicone mold, could cause a ripple on the top of your layers.
When pouring layers it is always a good practice to pour in swirls rather than dumping the soap base in one area. This eliminates any potential breakage between layers.